dinsdag 17 september 2013

3D Alice In Wonderland Shadowbox Box.

Posted by: .:♥Marit Pettinga-Meijer♥:. on dinsdag, september 17, 2013 8 Lovely people left a message!
Hallo Allemaal,
Vandaag wil ik iets laten zien waar ik erg trots op ben!
Ik heb deze Shadowbox doos namelijk helemaal zelf gemaakt van karton.
Ik heb het deksel voorzien van een dubbele bodem,
en hier in heb ik een 3D Alice In Wonderland tafereel gemaakt.
Verder heb ik de doos aangekleed zodat deze een beetje op een taart lijkt...
Dat leek me wel een leuk idee met een tea-party in gedachte.
Ik weet nog niet wat ik in de doos wil doen?!
Misschien een miniboekje voor foto's ofzo.
Maar zodra ik daar uit ben en iets gemaakt heb voor in de doos.
Laat ik jullie dit natuurlijk zo snel mogelijk ook zien!
***
Hello Everybody,
Today I want to show you guys something I am rather proud of!
Because I've made this shadowbox box totally from scratch.
I've made a double bottom for the lid of the box,
and placed a 3D Alice In Wonderland scene inside.
Further I decorated the box to make it look like a cake.
I figured that was cool with the whole tea-party in mind.
I'm still not sure what I want to put inside the box?!
Maybe a mini album for photos or something.
But I promise to show you all as soon as I figure that one out!
Challenges:

The Pink Elephant - Digital Images.
Crafts 4 Eternity - Recycle.
recycled item - music pages from an old music book.
Our Creative Corner - Forgotten Things.
The swirls on the sides I have bought about 3 or 4 years ago!
So glad I finally got to use them! :)
Really Reasonable Ribbon - Shabby Chic & Ribbon.


Materials:

Image: John Tenniel - Alice In Wonderland
Colouring Medium: Copic Ciao Markers.
Papers: Vintage Music paper from the thriftshop.
My Minds Eye - Best Of Damasks.
Piece of acetate from stash.
Embelishments: Lace & Ribbon Trim from stash.
Queen & Co - Felt Fusion - Classic Scroll White.
Euroland - Crystal Rhinestones.
Tools: Xenos - Foam Tape & Foam Dots.
Ranger Stickles - Gold, Orange Peel, Xmas Red & Crystal.
Creative Collection Glue/Varnish - Matt Multi Sealer.
Dremel 930 Gluegun.

handtekening

vrijdag 13 september 2013

Cupid Pin-up Girl Altered Frame.

Posted by: .:♥Marit Pettinga-Meijer♥:. on vrijdag, september 13, 2013 6 Lovely people left a message!
Hallo Allemaal,
Op deze vrijdag de 13e... hooeeeeeeee!!! :)
Wil ik jullie een houten lijstje laten zien dat ik ge-altered heb.
Ik heb eerst de digitale stempel van het Cupido Pin-up meisje in 3D opgewerkt.
Voor een video tutorial hoe ik dit doe klik je HIER en HIER!
Het houten lijstje heb ik eerst wit geschilderd met Gesso.
Nicole van Kalsbeek-Verkooijen was zo lief om wat sjablonen voor mij te snijden met de Silhouette Cameo.
(Smakkkk... nogmaals voor mijn super sjablonen Nicole)
Daarna heb ik rode acryl verf gemengd met grunge paste.
Door de gekleurde paste over het sjabloon te smeren kreeg ik de gave rode hartjes erop.
Daarna heb ik het kant en de bloemen op het lijstje vast gemaakt.
Als laatste heb ik mijn 3D Pin-up op het frame bevestigd met wat foamtape.
Ik hoop dat jullie deze net zo leuk vinden geworden als ik!
***
Hello Everybody,
On this friday the 13th... hooeeeeeeee!!! :)
I want to show you a wooden frame I've altered.
First I've 3D-ed the digital stamp of the cute Cupid Pin-up girl.
For a video tutorial on how I do this technique just click HERE and HERE!
I have painted the wooden frame in white with Gesso.
Nicole van Kalsbeek-Verkooijen was so sweet to cut me some templates with the Silhouette Cameo.
(Mwahhh... again for the awesome templates Nicole)
After that I mixed some red acrylic paint with grunge paste.
When I smeared the coloured paste over the template it gave the frame these cool red hearts.
Then I added the lace and flowers to the frame.
Finally I placed my 3D Pin-up onto the frame with some foamtape.
I hope you like this one as much as I do!
Challenges:

Lexi's Creations - Anything But A Card.
Tuesday Throwdown - Anything Goes.
 
Voor degene die het interresant vinden om te zien:
Hier zijn de delen waaruit het Cupido Pin-up meisje bestaat.
***
For those who find it interesting:
Here are the pieces that made the 3D Cupid Pin-up girl.


Materials:

Image: Mayzy Art.
Colouring Medium: Copic Ciao Markers.
0,W00,W1,YR000,YR00,YR02,YR23,YR61,Y11,Y21,
R05,R27,R46,G000,G21,B00,BG11.

Papers: Vintage music paper from stash.
My Minds Eye - Lost & Found - Madison Avenue.
Embelishments: Lace Doily from thriftshop.
Kaisercraft Journal Tags - After Five Collection.
Wild Orchid Crafts - Paper Flowers.
Always Surprise - Paper Leaves & Flowers.
So Low - Paper Flower vines.
Tools: 
Talens - Gesso.
LERO Hobby - 3D lijmkit.
Pergamano - Embossing Pennen & Matje.
Memento Dual Marker - Tuxedo Black.
Tim Holtz Distress Ink - Vintage Photo.
PaperArtsy - Grunge Past.
Art Talent - Red Acrylic Paint.
Dremel - 930 Gluegun & Hotglue.
Tweezers.
handtekening

woensdag 11 september 2013

Romantic Stacked Books Lamp.

Posted by: .:♥Marit Pettinga-Meijer♥:. on woensdag, september 11, 2013 3 Lovely people left a message!
Hallo Allemaal,
Vandaag wil ik jullie een lamp laten zien die ik ge-alterd heb!
Ik heb bij de kringloop winkel een oude lamp gekocht voor 2 euro en daar deze lamp van gemaakt.
Ik heb het armatuur los gehaald en heb mijn lieve man gevraagd om in elk boek een gat te boren.
Daarna heb ik het armatuur van de lamp door de boeken getrokken en vast gezet.
Als pootjes onder het onderste boek heb ik wat oude knopen genomen die ik gestapeld heb.
Daarna heb ik de lampenkap (die eerst gewoon creme kleurig was) beplakt.
Hiervoor heb ik boekpapier uit een oud woordenboek gebruikt.
Als laatste heb ik de randen van de lampenkap beplakt met een kanten randje en jute touw.
Ik vind hem zelf erg gaaf geworden, maar ben heel benieuwd wat jullie vinden?!
***
Hello Everybody,
Today I want to show you all a lamp I altered!
I went to the thriftshop and bought me an old lamp for only 2 euro's and made this lamp.
First I took apart the armature of the lamp and asked my hubby to drill a hole in every book.
After that I've pulled the armature through the holes in the books and secured it.
For legs under the bottom book I used some old buttons that I stacked.
Then I covered the lampshade that used to be plain creme coloured.
For this I used the pages out of an old dictionary.
Finally I added some lace trims around the lampshade and some burlap rope.
I think this turned out pretty awesome, but I am curious on what you all think of this one?!


Materials:

Lamp from the thriftshop.
Old books from stash & thriftshop.
Papers: Old dictionary.
Embelishments: Lace & Old Buttons from stash.
Tiger - Burlap Rope.
Tools: Drill & Screwdriver.
Creative Collection Glue/Varnish - Matt Multi Sealer.
Gluegun & Hotglue.
handtekening

maandag 9 september 2013

"My Angel" AB-Crystal Necklace.

Posted by: .:♥Marit Pettinga-Meijer♥:. on maandag, september 09, 2013 0 Lovely people left a message!
Hallo allemaal,
De vakantie periode is achter de rug en de kinderen zijn weer naar school.
Het is dus echt weer tijd om in de knutsel modus terug te komen!
Ik heb nog aardig wat projecten klaar liggen die ik aan jullie wil tonen.
Want hoewel ik de vakantie echt wel rust genomen heb en van mijn gezin heb genoten,
Heb ik hier en daar toch eindelijk wat projecten die ik lang geleden begonnen was af gemaakt!
Buiten dat heb ik de afgelopen maand regelmatig contact gehad met... China!
Maar wat daar voor spannends uit voort gaat komen horen jullie later deze week! ;)
Vandaag wil ik jullie een sieraad laten zien dat ik gemaakt heb.
Dit sieraad heeft de lengte van 80cm en is gemaakt met AB Crystal Glaskralen.
Het heeft als hanger een engeltje dat ik van dezelfde kralen en metalen vleugeltjes heb gemaakt.
Door de lengte van de ketting is het leuk als zomer sieraad, 
maar kan het ook heel makkelijk over een dikke trui straks als het kouder wordt!
***
Hello everybody,
The vacation season is over and the kids are back in school again.
So it's time to get back into the crafting mode and start crafting again!
I still have several projects waiting for me to show you guys.
Because even though I have really taken soms time off and enjoyed with my family,
I actually finally finished some projects I started long ago!
I also had contact with China regularly in the last month...!
But I will be filling you all in on the exited news about that one later this week! ;)
Totdat I want to show you all a jewelry piece I made.
This piece has a length of 80cm (apr. 16") and is made with AB Crystal Glassbeads.
It has an angel pendant I made from the same beads as the necklace and  metal angel wings.
Because of the length of the necklace it can be a fun summer piece,
But it woud also fit nicely over a warm sweater when it gets colder outside!

Materials:
 
Beads: So Low - AB Crystal Glassbeads.
Metals: So Low - 2" eyepins & Lobster Clasp.
Etsy's Discount Charms - Silver 0.5x2.5mm Curb Link Chain.
Etsy's Discount Charms - Beadcaps & Jumprings.
Tiny faux pearl and crystal bead from stash.
Sayila - Angel Wings.
Tools: Roundnose & Flatback Pliers.
handtekening

dinsdag 2 juli 2013

Mo Manning Rubik's Cube and Box.

Posted by: .:♥Marit Pettinga-Meijer♥:. on dinsdag, juli 02, 2013 29 Lovely people left a message!
Hallo Allemaal,
De mensen die mij op mijn Facebook volgen hebben hier al eerder een sneak preview van gezien.
Maar nu deze helemaal klaar is en het doosje ook is gemaakt wordt het tijd het geheel te showen!
Ik heb deze keer een simpele Rubik's Kubus gepimpt (voor zover een Rubik's Kubus simpel kan zijn).
Ik had dit ergens gezien met foto's maar ik wilde er een met zelf gekleurde Mo Manning digi's maken!
Ik heb eerst de 4 digi's ingekleurd en daarna in 9 gedeeld en geknipt.
Hierbij wel gelet op de plaatsing van de plaatjes zodat je geen halve gezichtjes krijgt!
Toen heb ik ze met glossy accents op de vakjes bevestigd en er nog een dikke laag overheen gedaan.
Omdat dit goed moest uitharden kon ik maar een kant per keer doen,
dus heeft de Kubus mij zoiezo al 6 dagen gekost om te maken.
Maar het resultaat is echt erg leuk en door de glossy accents ook vrij duurzaam!
Ik heb er ook nog een doosje voor gemaakt waar de Kubus in kan.
Ook deze heb ik met een Mo Manning digi gedaan en versierd.
Aan de binnenkant zit een verhoging met een uitsparing waardoor de kubus heel speels rechtop blijft staan!
Ik ben heel benieuwd wat jullie van mijn nieuwste project vinden!
Hello Everybody,
The people who follow me on Facebook have already seen a sneak preview of this one
But now that it's completely finished  and the box is made It's time to show the end result!
This time I pimped a simple Rubik's Cube (as far as a Rubik's Cube can be simple).
I had seen this somewhere with photos but I wanted to do this with hand coloured Mo Manning digis!
First I've coloured the 4 digis and then devided them in 9 pieces and cut them out.
I had to be careful of the placement so I would not get any cut off faces!
Then I adhered them with glossy accents and then layered some on top as well.
Because this had to harden really well I could only do one side at a time,
So making the cube has taken a total of 6 days all together.
But the end result is well worth it and it makes it more durable also!
I've also made a little box to fit the Cube in.
I also decorated the box with a digital stamp by Mo Manning.
On the inside I made a tray with a hole in it so the cube stands up inside the box!
I am really curious to what you all think of this new project I made!

Challenges:
 
Mo's Digital Challenge - Fun In The Sun.
The Shabby Tea Room - Glorious Flowers.
Cupcake Craft Challenges - Anything But Square.
Papertake Weekly - Anything Goes.
Simon Says Stamp - Anything Goes.
Crafts And Me - Anything Goes.
Crafts For Eternity - Heavy Metal.
Stampin' For The Weekend - Anything Goes.
Really Reasonable Ribbons - Anything But A Card + Ribbon/Lace.
Materials:

Image: Mo Manning.
Colouring Medium: Copic Ciao Markers
Rubik's Cube Fairy:
E50,E51,E53,R02,Y000,Y38,YR04,YR31,
G000,YG11,YG13,YG23,BG11,B23,B32,B93.
Flexmarker - B336 Cadet Blue.
Rubik's Cube Angry Girl:
E25,E33,E35,E50,E51,E53,E93,
B000,B00,B02,B23,B28,B29,Y21,YR23,YR31.
Rubik's Cube Blowing Girl:
YR000,YR00,YR02,YR61,R000,R00,R20,R83,R85,RV34.
Rubik's Cube Red Head Girl:
V01,V04,V06,V12,YG11,G000,G21,G82,
R02,R05,R24,E21,E33,E51,E53,YR000,YR00,YR61.
Flexmarker - R735 Firebrick.
Rubik's Cube Box:
W00,W1,W2,R32,RV13,RV42,
Y11,Y21,YR000,YR00,YR02,YR23,YR61.
Papers: Old Music Paper from stash.
Embelishments: Xenos - Lace.
The Ribbon Girls - Lace.
Wild Orchid Crafts - Paper Flowers.
Always Surprise - Paper Leaves.
Art Talent - Gold Rhinestones.
Eyelets from stash.
Tools: Sizzix - Big Shot Machine.
Cart-us - Oval Die.
Xcut Dielicious Decorative Dies - Tags & Bookplates.
Ranger - Glossy Accents.
Ranger Stickles - Gold.
LERO - 3D Lijmkit.
Pergamano - Embossing Pens & Mat.
Tweezers & Gluegun.
 

handtekening

Fairy Champagne Cork Necklace.

Posted by: .:♥Marit Pettinga-Meijer♥:. on dinsdag, juli 02, 2013 4 Lovely people left a message!
Hallo Allemaal,
Hier ben ik weer met een nieuwe ketting/hanger die ik gemaakt heb.
Ik ben namelijk lid van de B'sue Boutiques Creative Group op Facebook,
en daar zag ik dat de getalenteerde Renee Webb Allen hele gave sieraden van kurken maakte.
Omdat ik wist dat ik nog een oude champagne kurk had liggen heb ik die ook maar eens gepimpt!
En dit is daar dan uiteindelijk het resultaat van geworden!
Ik vindt het zelf een plaatje geworden en ben benieuwd wat jullie vinden?!
Dit soort hangers kan natuurlijk ook heel leuk als charm aan een minialbum,
maar ik heb de mijne aan een hele lange ketting gehangen.
***
Hello Everybody,
Here I am again with a new necklace/pendant that I've made.
I am a memeber at the B'sue Boutiques Creative Group at Facebook,
and there I saw the talented Renee Webb Allen who makes gorgeous jewelry out of corks.
Because I knew I had this old champagne cork laying around I went ahead and pimped mine!
And this is the result of my creative work!
I think it turned out stunning but I am curious to find out what you all think?!
These could also be awesome as a charm on a minialbum,
but I have hung mine on a very long necklace.
Materials:
 
Champagne Cork from stash.
Hotfix - ss10 & ss16 Crystal Rhinestones.
Hotfix - ss10 & ss16 Capri Rhinestones.
Beads: Art Talent - Beadset.
MK Beads - Czech Glass Firepolish Faceted Rounds 10mm Luster Prairie Green (CZF106)
Metals: So Low - 2" eyepins.
Xenos - 2mm Oval Chain.
Metal Corner with lady face from stash.
Sayila - Fairy Wings.
Etsy's Discount Charms - Beadcaps & Key Charm.
Tools: Tim Holtz Idea-ology - Drill Punch.
Pliers & Tweezers.
E6000 & Hansulith Glue.
handtekening

vrijdag 28 juni 2013

Faux Vintage Daubed Lettering Door Sign.

Posted by: .:♥Marit Pettinga-Meijer♥:. on vrijdag, juni 28, 2013 2 Lovely people left a message!
Hallo Allemaal,
Hier ben ik met iets heel anders dan jullie van mij gewend zijn!
Ik heb deze keer namelijk een naambordje voor bij ons nieuwe huis buiten gemaakt.
Ik vond bij de Big Bazaar een dienblad van 60x20 cm.
En had meteen het idee om daar met verf en sjablonen tekst op te tamponneren.
Ik heb de namen allemaal in verschillende fonts uitgeprint en uitgesneden.
Daarna heb ik met acrylverf de letters gekleurd.
Ik vind het zelf erg gaaf geworden en ben benieuwd wat jullie vinden!?
***
Hello Everybody,
Here I am with something differend than what you are used of from me!
This time I've made a name sign for outside our new home.
I found this 60x20 cm serving tray at Big Bazaar.
And I emediately thought this would be cool with some white lettering on it.
I've printed and cut out all the names in several fonts.
And then coloured the letters with white acrylic paint.
I think this turned out really awesome, but what do you all think!?


Materials:

Colouring Medium: White Acrylic Paint by van Eyck.
Tools: Craft knife for cutting the lettering.
Sponge dauber for daubing the lettering.
Painters tape.
handtekening

woensdag 26 juni 2013

"Mother & Son" - 9x9" Mini Layout.

Posted by: .:♥Marit Pettinga-Meijer♥:. on woensdag, juni 26, 2013 1 Lovely people left a message!
Hallo Allemaal,
Hier is dan de laatste van mijn 4 mini layouts serie die ik gemaakt heb.
Voor de achtergrond van deze layout heb ik verschillende papiertjes als een quilt gemaakt.
Ik heb elk stukje papier rondom met de hand gestikt, dit geeft de achtergrond een classy uiterlijk.
Het is ongelovelijk veel werk om te doen maar het is het resultaat meer dan waard!
Ik heb lekker een film opgezet en heb tijdens het kijken met de hand zitten naaien.
Let wel op dat als je de gescheurde gekrulde hoekjes wilt maken
je dit voor het stikken moet doen zodat je beide kanten mooi kunt stikken.
Ik heb de rest van de layout aangekleed met veel bloemen en gekruld muziekpapier.
Dit maakt dat het naar mijn mening een prachtig romantische layout is geworden.
***
Hello everybody,
Here is my last of the series of four mini layouts that I've made.
For the background I paper quilted with several differend design papers.
I've stitched around the edges of every single piece of paper by hand to give it this classy look.
It's a lot of work to get it this way but it's well worth the outcome!
I've just put on a movie and hand stiched all the papers while watching.
Make sure that if you want teh torn and curled corners in the papers to do so before stitching.
This way you can make sure that both sides are stitched beautifully.
The rest of the layout is dressed up with lots of paper flowers and curled music paper.
This makes it a beautifully romantic layout in my opinion.
Materials:

Image: Homeprinted photo.
Papers: My Minds Eye - Lush - Blue Damask.

My Minds Eye - The Linen Closet.
Scenic Route - Rockland Chestnut Street.
Old Music paper from the thriftstore.
Tilda papers from stash.
Embelishments: Wild Orchid Crafts - Paper Flowers.

So Low - Flower Stems & Vines.
Euroland - Rhinestones.
Yarn for stitching from stash.
Tools: Tim Holtz Distress Ink - Vintage Photo.

Inssentials - Ink Blending Tool.
Mistbottle with water.
Gluegun & Scissors.
handtekening

maandag 24 juni 2013

"Butterfly Kisses Girl" - 9x9" Mini Layout.

Posted by: .:♥Marit Pettinga-Meijer♥:. on maandag, juni 24, 2013 1 Lovely people left a message!
Hallo Allemaal,
Ik hoop dat jullie allemaal een lekker weekend achter de rug hebben!
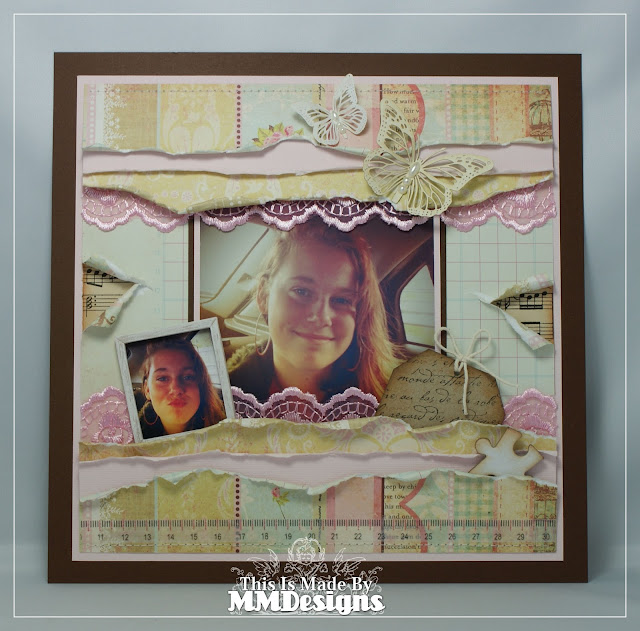
Vandaag wil ik jullie de derde van mijn vier layouts laten zien die ik gemaakt heb.
Deze keer heb ik twee foto's gebruikt die ik laatst in de auto van mijn dochter Jennifer heb gemaakt.
Ik heb de foto's eerst op de Iphone bewerkt met Instagram.
Als je ook een Iphone hebt raad ik je dit enorm aan ook eens te doen!
Je krijgt er prachtige fotos door die enorm leuk zijn voor je scrap layouts.
Ik heb mijn papier keuze dan ook aangepast op de kleuren die er in mijn foto's zitten.
Dit geeft het geheel een prachtig uiterlijk!
***
Hello Everybody,
I hope you all have had a nice weekend!
Today I want to show you the thirth layout from my series of four that I've made.
This time I've used photos I made in the car the other day of my daughter Jennifer.
First I edited these photos on Instagram with my Iphone.
For those who also have a Iphone I highly reccoment trying this!
You get the most beautiful pictures to use on your scrap layouts.
I've chosen my papers after the colours that are in my photos.
I think it gives the whole a great look!
Materials:

Image: Homeprinted photos.
Papers: The Girls Paperie - Vintage Whimsy - Bits & Pieces.

The Girls Paperie - Vintage Whimsy - Frou Frou.
Old Music paper from the thriftstore.
Embelishments: IKEA - Craft Tag.

Lace, Twine & yarn for stitching from stash.
Prima  Marketing - Shabby Chic Treasures - Resin Window.
Rayher - Karen Marie Klip - Lasercut Butterflies.
Tiger - Do It Yourself Jigsaw Puzzle.
Kars - Pearl Rhinestuds - Acrylic Light Gold.
Wibra - Measuring Washi Tape.
Tools: Stampin' Up - Frensh Script Stamp.

Memento - Tuxedo Black Ink.
Tim Holtz Distress Ink - Vintage Photo.
Inkssentials - Ink Blending Tool.
Needle for handstitching.
Gluegun & Scissors.
handtekening

vrijdag 21 juni 2013

"Boys Will Be Boys" - 9x9" Mini Layout.

Posted by: .:♥Marit Pettinga-Meijer♥:. on vrijdag, juni 21, 2013 4 Lovely people left a message!
Hallo Allemaal,
Hier is dan de tweede layout uit mijn serie van 4 die ik gemaakt heb.
Dit is meer een jongens layout geworden omdat het ook nogal een stoere foto is.
Ik heb wederom de papier randen omgekruld, maar deze keer heb ik twee extra lagen gebruikt.
Ook heb ik de twee lagen aan elkaar gemaakt door middel van eyelets en twine.
Ik vind het zelf net lijken op een overhemd zo!
Verder heb ik eindelijk eens mijn (eeuwen) oude jongens stickers tevoorschijn gehaald.
Ik vindt het zelf een erg gave layout geworden, maar ben erg benieuwd wat jullie vinden?!
***
Hello Everybody,
Here is the second layout from my series of four that I've made.
This is more of a boyish layout because I had this cool looking photo to use.
Again I curled the papers like the one before, but this time I used two extra layers.
I've attached the two extra layers together with some eyelets and twine.
I think it looks just like a mens shirt now!
Further I've used up a bunch of my (ancient) old boy stickers I had laying around.
I think it has become such a cool layout, but I am curious to what you guys think?!
Materials:

Image: Homeprinted photo.
Papers: Little Yellow Bicycle - Navy Schedule.
Little Yellow Bicycle - Brown Geometric.
Scribble Scrabble - Party Time.
Basic Grey - Aged & Confused - Phresh & Phunky Phont.
Old Music paper from the thriftstore & Notepad page.
Embelishments: Making Memories - Woven labels - boy.

Making Memories - Die cut stickers - Like it is all boy.
Making Memories - Flocked ephemera stickers - Travel.
Twine, Metal cricle & Eyelets from stash.
Tools: Mistbottle with water.
Tim Holtz Distress Ink - Vintage Photo.
Inkssentials - Ink Blending Tool.

We R Memory Keepers - Crop-a-dile.
Gluegun & Scissors.
handtekening

woensdag 19 juni 2013

"Mothers Love Sonate" - 9x9" Mini Layout.

Posted by: .:♥Marit Pettinga-Meijer♥:. on woensdag, juni 19, 2013 1 Lovely people left a message!
Hallo Allemaal,
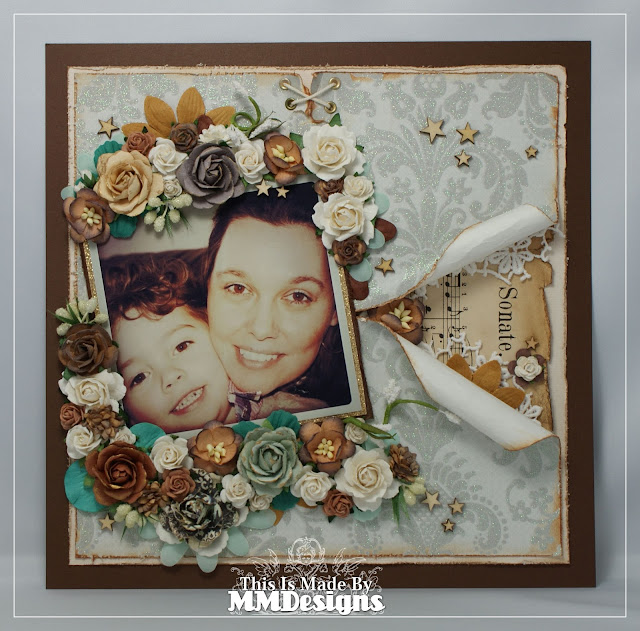
Vandaag wil ik jullie de eerste van 4 mini layouts laten zien die ik gemaakt heb.
Ik heb 4 schaduwlijsten bij IKEA gekocht en die hebben altijd met foto's in mijn zoon z'n kamertje gehangen.
Maar nu we verhuisd zijn hangen ze in de gang en werd het tijd er eens iets nieuws in te doen!
Omdat deze lijsten 4,5 cm diep zijn is het enorm leuk hier een 9x9" layout in te doen met veel 3D embellishments.
Daarom heb ik het achtergrond papier omgekruld zodat je het papier er onder goed kunt zien.
Dit geeft een vintage look aan je pagina en ziet er erg gaaf uit.
Het krullen doe ik door een scheur in het papier te maken.
Daarna maak ik het met een mistflesje wat vochtig en rol ik de hoekjes om een dikke pen of kwast.
Zodra het papier dan opdroogd blijft het in de opgerolde stand staan.
Met heel veel bloemen en blaadjes vind ik dit zelf een erg mooie en romantische layout geworden.
***
Hello Everybody,
Today I want to show you the first of four mini layouts that I've made.
I've bought 4 shadowboxframes at IKEA that had alway hung in my son's room.
But since we've moved they were hanging in de hallway and it was time to put something new in them!
Because the depth of these frames is 4,5 cm it's so much fun to put in a 9x9" layout with lots of 3D embellishments.
That's why I curled the background paper so you can take a peek at the papers behind it.
This gives the page a vintage feel and look really cool.
I've curled the paper by first making a tear into the page.
After that I made the paper moist by spraying with a mistbottle and roling the paper around a big pen or brush.
As soon as the paper dries it will stay in the curled up position.
With lots of paper flowers and leaves I think this has become a pretty and romantic looking layout.
Materials:

Image: Homeprinted photo.
Papers: DCWV - The Linen Closet.
Old Music paper from the thriftstore.
Gold glitter paper from stash.
Embelishments: Wild Orchid Crafts - Flowers.

Prima Marketing - Paper & Fabric Flowers.
So Low - Paper flower vines.
Lace from the thriftstore.
Xenos - Wooden stars.
Twine from stash.
Tools: Mistbottle with water.

Tim Holtz Distress Ink - Vintage Photo.
Inkssentials - Ink Blending Tool.
Tim Holtz - Paper Distresser.
Gluegun.
handtekening

dinsdag 18 juni 2013

"Steampunk Tiffany" Leather Cuff Bracelet.

Posted by: .:♥Marit Pettinga-Meijer♥:. on dinsdag, juni 18, 2013 2 Lovely people left a message!
Hallo Allemaal,
Deze keer wil ik jullie een leren armband laten zien die ik gemaakt heb.
De sluiting is door middel van een drukkertje zodat deze makkelijk af en aan te doen is!
Het lint is vast gemaakt met 4 eyelets aan elke zijde.
Aan het lint vast zit een vintage polshorloge met daarin vintage horlogeonderdelen gegoten in Ice Resin.
Door het kant en het licht "tiffany's" groene lint geeft het deze armand een romantisch tintje.
Ik ben zelf helemaal weg van deze armband, ik hoop jullie ook!?
***
Hello Everybody,
This time I want to show you all a lether cuff bracelet I made.
It closes with a pushbutton on the inside so it can be taken off easily!
The ribbon is attached with 4 eyelets on both sides.
Attached to the ribbon is a vintage wristwatch with some vintage watchparts poured in Ice Resin.
Because of the lace and "tiffany" green ribbon this is a romantic looking bracelet.
I am really in love with this bracelet, I hope you'll love it to!?
Materials:

So Low - Lace.
Hobbyvoordeel - Ribbon.
Leather & Eyelets from stash.
Metals: Ebay - Vintage wristwatch case.
B'sue Boutique - Vintage watchparts.
Tools: Ice Resin.
We R Memory Keepers - Crop-a-dile.
Hammer & Tweezers.
handtekening

maandag 17 juni 2013

Strawberry Box - *Bling, Bling* Onesie & Card Set.

Posted by: .:♥Marit Pettinga-Meijer♥:. on maandag, juni 17, 2013 15 Lovely people left a message!
Hallo Allemaal,
Gisteren liet ik op mijn Facebook een preview zien van dit schattige stempeltje dat ik gebruikt heb!
Hier is dan het uiteindelijke resultaat van mijn gehele project.
Het is een doosje in de vorm van een aardbei die echt super leuk is om te maken!
Een rompertje waar ik met hotfix strass steentjes een aardbei op heb gemaakt.
En een bijpassende kaart met het schattige stempeltje van Mo Manning.
***
Hello Everybody,
Yesterday I showed a preview of this adorable stamp I had used on my Facebook!
And finally I can show you guys the outcome of my whole project.
It's a box in the shape of a strawberry wich is super fun to make!
A onesie that I added a rhinestone strawberry on.
And a matching card with the cute stamp by Mo Manning.
Onesie Materials:

Strawberry Image:
Silhouette America.
Hotfix Rhinestones - ss10 Emerald (green).
Hotfix Rhinestones - ss16 Siam (Red).
Tools: Sew Mate - Applicator Wand.
Wax Paper (inside onesie).
Tweezers.
Voor het aardbei doosje heb ik een template gekocht bij My Scrap Chick!
Wanneer je een project bij deze onlineshop koopt krijg je deze in een duidelijk PDF formaat aangeleverd.
Deze kun je dan uitprinten en met de hand uit knippen of snijden.
Wat helemaal gaaf is dat je de snijbestanden ook meteen in verschillende formats krijgt.
AI,DXF,GSD,KNK,SVG en WPC zodat je het ook met je snijmachine kunt uitsnijden!
***
For the strawberry box I bought a template at My Scrap Chick!
When you buy a project at this oneline shop you get a clear and simple PDF.
You can print out your PDF and cut this by hand or with a craftblade.
What's really cool is that you also get cutfiles with your order in several formats.
AI,DXF,GSD,KNK,SVG and WPC so you can also cut these with your digital cutting machine!
Strawberry Box Materials:

Papers: Red & Green Cardstock.
Embelishments: Wild Orchid Crafts - Paper Flowers.
Always Surprise - Paper Leaves.
So Low - Flower Branches.
Xenos - Wooden Ladybugs.
Really Reasonable Ribbons - Lace & Ribbon.
Tools: Sizzix - Big Shot Machine.
Cuttlebug - Swiss Dot Embossing Folder.
Tim Holtz - Vintage Photo Distress Ink.
Inkssentials - Blending Tool.
Ranger - Glossy Accents (as glue).
Gluegun.
Challenges:
 
Bunny Zoe's Crafts - Wings. 
The Shabby Tea Room - Ruffles & Ribbon.
Crafts And Me - Vintage.
Fab 'n' Funky - Birthday.
Charisma Cardz - Digis Only.
Cute Card Thursday - Once Upon A Time.
Fussy and Fancy - Button Up.
Our Creative Corner - Recipe (Lace/Ribbon-Wood-Inks).
Really Reasonable Ribbon - I'm Seeing Dots & Ribbon.
Card Materials:

Image:
Mo Manning.
Colouring Medium: Copic Ciao Markers.
E50,E51,E53,Y000,R05,R24,R37,G000,G82,G94.
Papers: My Minds Eye - Lost & Found - Market Street.
Embelishments: Wild Orchid Crafts - Paper Flowers.
Always Surprise - Paper Leaves.
Xenos - Wooden Ladybug.
Really Reasonable Ribbons - Lace & Ribbon..
White yarn for stitching.
Tools: Sizzix - Big Shot Machine.
Magolia Doohickeys - Leaves Die.
Spellbinders Nestabilities - Standard Circles Large.
Docrafts Xcut Nesting Dies - Ornate Frame.
by Avec - Daisy Borderpunch.
Needle for stitching.
Ranger Glossy Accents.
Ranger - Stardust Stickles.
Gluegun.
handtekening

zaterdag 15 juni 2013

"Captured in Time" Steampunk Necklace.

Posted by: .:♥Marit Pettinga-Meijer♥:. on zaterdag, juni 15, 2013 2 Lovely people left a message!
Hallo Allemaal,
Hier weer een ketting met Ice Resin die ik gemaakt heb.
Deze keer heb ik een koper kleurige ring gebruikt om de resin in te gieten.
Ook deze heb ik ingelegd met vintage horloge onderdelen van B'sue Boutiques.
Deze hanger hangt aan een vintage bronze ketting met daartussen Turquoise Howlite Kralen van 8mm.
Omdat het mooier bij de kralen in de ketting paste heb ik er voor gekozen de capri hotfix steentjes te gebruiken.
Door het vintage brons en het koper is dit een schitterend oud uitziend steampunk sieraad geworden.
***
Hello Everybody,
Here is another necklace with Ice Resin I made.
This time I used a copper colored ring to pour in the resin.
I've also put some vintage watch parts by B'sue Boutiques in this piece.
This pendant hangs on a beautiful vintage bronze chain with 8mm Turqoise Howlite Beads.
To fit the beads I used capri hotfix rhinestones for this piece.
Because of the vintage bronze and copper this has become a gorgeous vintage steampunk piece.
Materials:

Metals: Copper Jewelry ring from stash.
Etsy's HopscotchCraftSupply - Antique Bronze Jumpringset (F03).
Etsy's eric8429 - 2x3mm Antique Bronze Flat Oval Chain (G1018).
Etsy's eric8429 - Antique Bronze Clasp (C687).
B'sue Boutiques - Funky Vintage Watchparts.
Etsy's Beadsupplies - Eyepins (FN-HP-03002).
Eyelet & Nail Decoration stars from stash.
Beads: Etsy's BellasBeadHabit - 8mm Turqoise Howlite Beads.
Hotfix - Capri Rhinestones (ss06).
Tools: Ice Resin.
E6000 Glue & Hasulith Jewelry Glue.
Pliers & Tweezers.
handtekening

donderdag 13 juni 2013

"Captured In Love Dream Hope Trust" Steampunk Necklace.

Posted by: .:♥Marit Pettinga-Meijer♥:. on donderdag, juni 13, 2013 3 Lovely people left a message!
Hallo Allemaal,
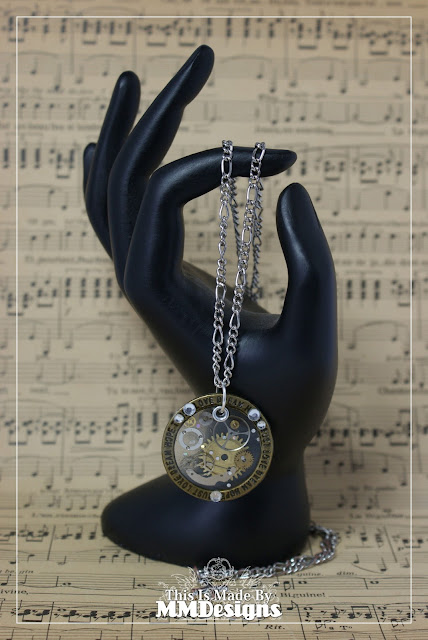
Vandaag wil ik jullie weer een nieuwe Ice Resin ketting laten zien.
Dit exemplaar heb ik speciaal voor mijn mannetje gemaakt!
Eerst heb ik de vintage bronze ring met tekst op mijn non stick mat gelegd en daar Ice Resin in gegoten.
Daarna heb ik de vintage horloge onderdeeltjes van B'sue Boutique in de resin gestopt.
Omdat de Ice Resin hierbij iets buiten de ring vloeit
heb ik na het uitharden het overige weg geschuurd met een nagelvijl.
Het gaatje waar deze hanger aan hangt heb ik heel makkelijk met de crop-a-dile gemaakt.
Hier heb ik voor extra stevigheid en sier een eyelet in gedaan.
Hierna heb ik de hotfix strasssteentjes met sieradenlijm op de ring bevestigd.
Doordat het Ice Resin doorzichtig is lijkt het alsof de radertjes los hangen.
Dit geeft het sieraad een heel apart en steampunk gevoel!
***
Hello Everybody,
Today I want to show you a new Ice Resin necklace I made.
I made this piece especially for my hubby!
First I placed the bronze ring with text on my non stick craft mat and poured in some Ice Resin.
After that i've placed some vintage watch parts by B'sue Boutique in the resin.
Because the Ice Resin flows outside the ring I sanded it down with a nail vile.
I verry easily made the hole from wich the pendant hangs with the crop-a-dile.
And placed an eyelet in this hole for extra streangth and a finished look.
After this I stuck some hotfix rhinestones on the ring with jewelry glue.
Because the Ice Resin is see through it looks like the gears are floating loose.
This gives the piece an amazing steampunk feel!
Materials:

Metals: Etsy's HopscotchCraftSupply - Silver Jumpringset (F06).
Etsy's HopscotchCraftSupply - Antique Bronze Hope Love Trust Dream Ring (C1641).
B'sue Boutiques - Funky Vintage Watchparts.
Ruan Creatief Almere - Silver Chain.
So Low - Clasp.
Eyelet & Cross Charm from stash.
Beads: Hotfix - Crystal Rhinestones (ss10-ss16)
Tools: Ice Resin.
E6000 Glue & Hasulith Jewelry Glue.
Pliers & Tweezers.
handtekening

dinsdag 11 juni 2013

"New Home" Pollycraft card.

Posted by: .:♥Marit Pettinga-Meijer♥:. on dinsdag, juni 11, 2013 8 Lovely people left a message!
Hallo Allemaal,
Hier ben ik weer met een nieuw kaartje.
Deze keer heb ik weer eens een verhuiskaartje gemaakt.
Ik vind deze altijd best lastig om te maken omdat het thema me niet enorm inspireert.
Maar ik denk dat het altijd goed is jezelf een challenge te geven!
Ik ben best tevreden over dit kaartje en het digitale plaatje van Pollycraft vindt ik helemaal geweldig!
En... Ik hoop dat ik jullie er weer mee mag inspireren!
***
Hello Everybody,
Here I am again with a new card.
This time I made another card for someone who's moving.
I find it hard to make a card with this theme because it doesn't inspire me much.
But I think it's always a good thing to just challenge yourself!
I am quite pleased with how this card turned out and I think the digital image by Pollycraft is awesome!
And... I hope I can inspire you all again with this one!
Challenges:

Simon Says Stamp - Masculine.
Papertake Weekly - Male Card.
Tuesday Throwdown - You're the Man.
Crafts 4 Eternity - For The Boys.

Materials:

Image: Pollycraft.
Colouring Medium: Copic Ciao Markers.
E02,E35,E37,E47,E57,G000,YG11,C3,C1,C0.
Papers: My Minds Eye - On The Bright Side - Two.
Echo Park - This & That - Graceful.
Embelishments: Echo Park - This & That - Alpha Stickers.
TOGA Createur d'envies - Cork Alphabet.
Euroland - Rhinestones.
So Low - Paper Doily.
Sewing Yarn.
Tools: LERO - 3D Lijm Kit.
Pergamano - Embossing Tools & Pad.
Tim Holtz Distress Ink - Vintage Photo.
Ranger Inkssentials - Ink Blending Tool.Needle for sewing.
handtekening

maandag 10 juni 2013

"Angels Key" Bottle Necklace.

Posted by: .:♥Marit Pettinga-Meijer♥:. on maandag, juni 10, 2013 2 Lovely people left a message!
Hallo Allemaal,
Ik heb deze keer weer een nieuwe ketting om jullie te laten zien!
Ik heb laatst de Ice Resin weer eens uit mijn lade gevist om wat dingen te maken.
En daar is dit "Angels Key" flesje met het sleuteltje er in er één van.
Ik heb eerst het sleuteltje aan een touwtje in het midden van het flesje gehangen.
Daarna heb ik de helft van het flesje gevult met Ice Resin en het geheel uit laten harden.
Vervolgens heb ik het touwtje los gemaakt en de rest aangevult met Ice Resin.
Hierdoor is het net alsof het sleuteltje drijft, maar deze zal nooit op de bodem gaan liggen.
Verder heb ik het engeltje zelf in elkaar gezet met een echte vintage limited edition Swarovski kristal.
Ik ben zelf eigenlijk helemaal weg van dit sieraad...
het sparkelt heerlijk als je het draagd door de strass steentjes rond het halsje.
***
Hello Everybody,
I have a new necklace to show you all this time!
I'ts been a while that I've pulled my Ice Resin out of my drawer to make some stuff.
And this "Angels Key" bottle with key is one of my new projects I made.
First I hang the key on some string in the middle of the bottle.
After that I've filled half the bottle with Ice Resin and let is sit until it was completely hardened.
Then I untied the string, pulled it from the key and filled the rest with Ice Resin.
This way it is just like the key is floating but it will never sink to the bottom.
Further I made the angel myself out of a real vintage limited edition Swarovski crystal.
I absolutely adore this piece of jewelry myself...
it sparkles gorgeously when you wear it because of all the rhinestones at the bottleneck.
Materials:
Etsy's StainedGlassKarin - Glass Bottle Charm With Rubber Stopper.
Metals: Etsy's HopscotchCraftSupply - Silver Curb Link Chain (CH04).
Etsy's HopscotchCraft Supply - Silver textured Cone Bead Cap (B24).
Etsy's HopscotchCraftSupply - Antique Silver Flower Beadcap (SC159).
Etsy's HopscotchCraftSupply - Silver Jumpringset (F06).
Etsy's HopscotchCraftsSupply - Antique Bronze Assorted Key (BC175)
Etsy's StainedGlassKarin - Made With Love Heart Charm.
B'sue Boutiques - Funky Vintage Watchparts.
So Low - Clasp, Headpin, Eyepin & Nail Decoration Glitters.
Angel Wings and small bead from stash.
Beads: Lizyjose - 8mm Swarvoski Crystal Bead (Blue) & Crystal inlay bead.
Etsy's CouloirW - Vintage DS & Co Limited Edition Swarovski CrystalAB Bead.
Hotfix - Crystal & Capri Blue Rhinestones.
Tools: Ice Resin.
E6000 Glue & Hasulith Jewelry Glue.
Pliers & Tweezers.
 
handtekening

BEDANKT VOOR HET BEZOEKEN VAN MIJN BLOG!
Ik hoop dat je het naar je zin hebt gehad op mijn blog?! En snel nog eens langs komt om mijn nieuwe berichten te bekijken!

THANKS FOR VISITING MY BLOG!
I hope you liked visiting my blog?! And I hope you will return sometime soon to view new messages!


Scrap-a-licious-times Copyright © 2013 Scrap-a-licious-times is Designed by MMDesigns